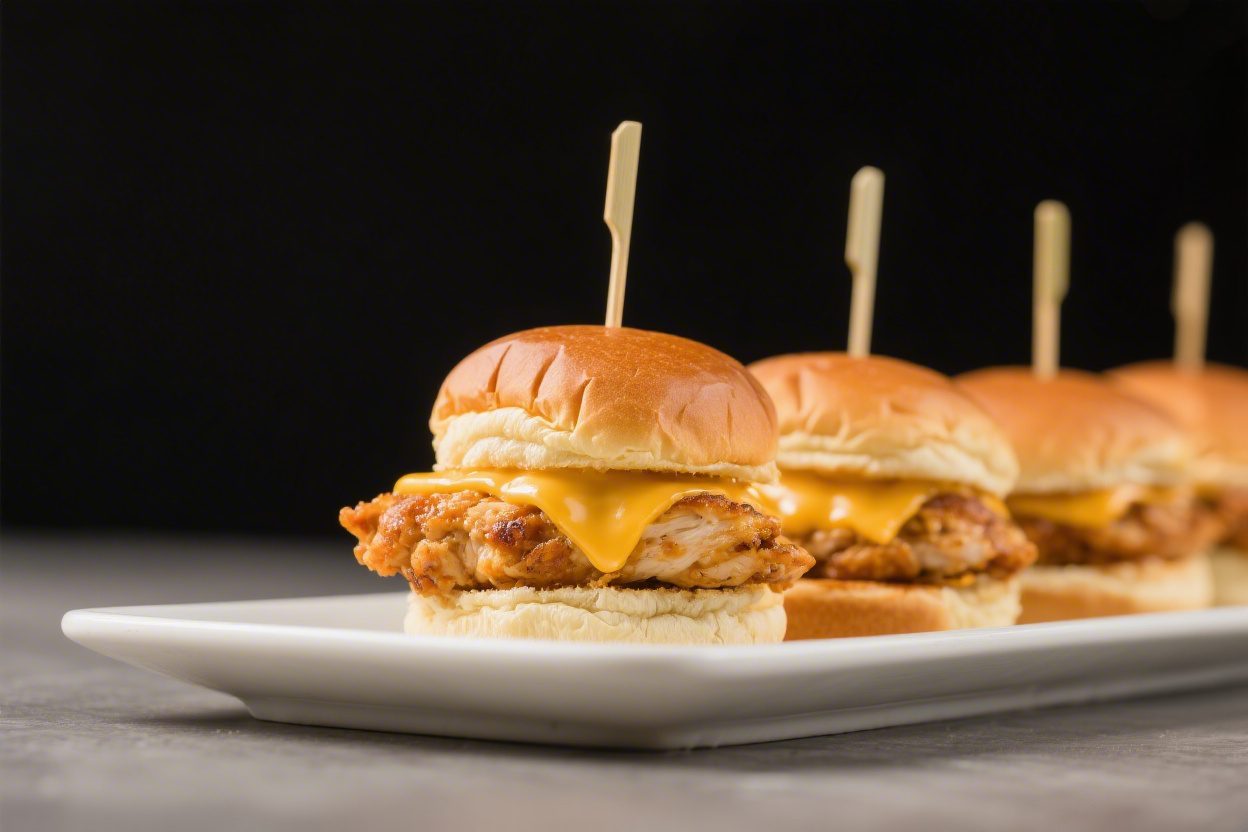
Cheesy Chicken Sliders – Easy, Crowd-Pleasing Comfort Food
These cheesy chicken sliders are the kind of snack-meets-dinner you’ll want on repeat. They’re warm, melty, and packed with flavor without being fussy or time-consuming. Perfect for game day, family nights, or a casual get-together, they come together fast and bake up beautifully.
The best part? You can use leftover chicken or rotisserie chicken to make things even easier. Simple ingredients, minimal prep, and a big payoff—what’s not to love?
Ingredients
Method
- Preheat the oven: Set it to 350°F (175°C). Line a 9x13-inch baking dish with parchment or lightly grease it.
- Split the rolls: Without separating the individual rolls, slice the entire slab horizontally to make a top and bottom. Place the bottom half in the baking dish.
- Make the chicken filling: In a large bowl, combine shredded chicken, mozzarella, cheddar, cream cheese, mayonnaise, hot sauce, green onions, garlic powder, onion powder, smoked paprika, salt, and pepper. Mix until evenly coated and creamy.
- Assemble the sliders: Spread the chicken mixture evenly over the bottom half of the rolls. Place the top half of the rolls over the filling and press gently.
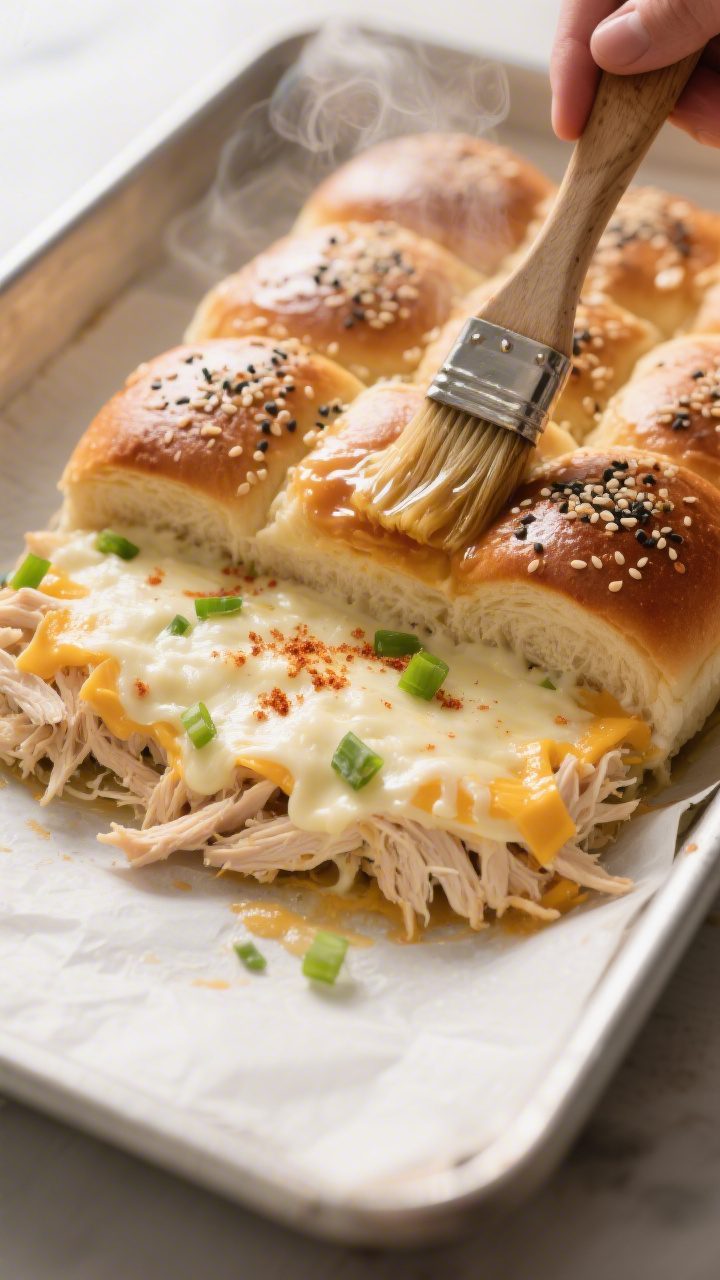
- Make the butter topping: Stir melted butter with Worcestershire and a pinch of garlic powder. Brush generously over the tops of the rolls. Sprinkle with sesame or poppy seeds if using.
- Bake: Cover the dish loosely with foil and bake for 15 minutes. Remove foil and bake another 8–10 minutes, until the tops are golden and the cheese is melted.
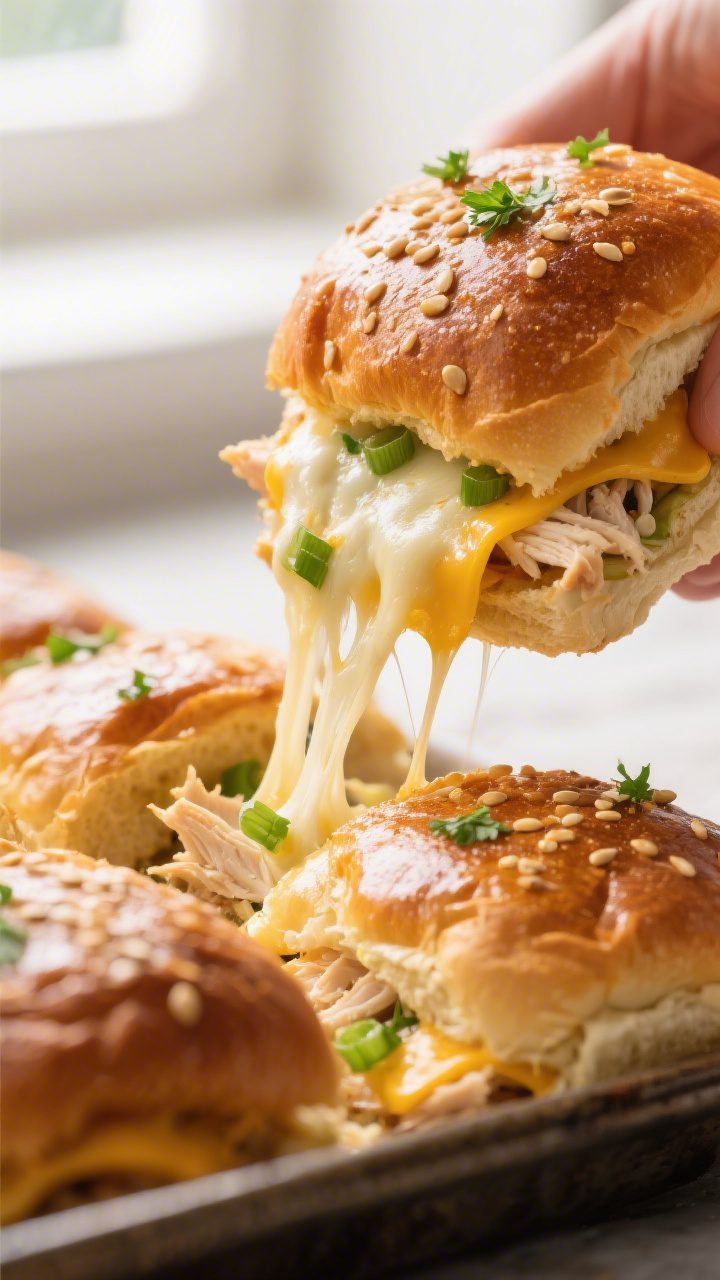
- Rest, then slice: Let the sliders rest for 5 minutes so they set. Use a serrated knife to slice into individual pieces. Garnish with parsley if you like.
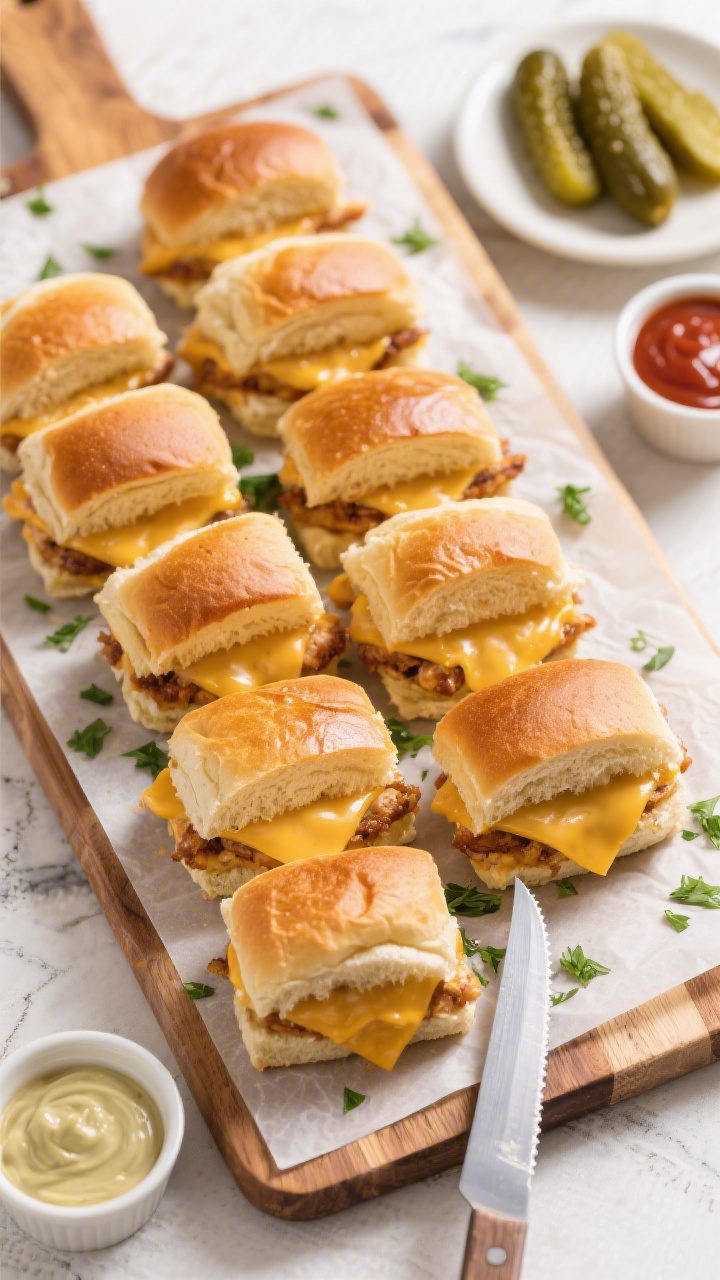
- Serve: Enjoy warm with simple sides like a green salad, coleslaw, or roasted veggies.
Why This Recipe Works
These sliders work because they lean on bold, reliable flavors and smart shortcuts.
Using shredded chicken keeps the filling juicy and tender, while a mix of cheeses adds both melt and stretch. Hawaiian rolls bake up soft with a lightly crisp, buttery top for the perfect bite. A quick garlic-butter topping locks in flavor and helps the cheese and chicken stay moist.
Everything bakes together so the sliders hold their shape and slice cleanly.
What You’ll Need
- Slider rolls: 1 package of 12 Hawaiian-style rolls (or any soft dinner rolls)
- Cooked chicken: 3 cups shredded (rotisserie works great)
- Cheese: 2 cups shredded mozzarella and 1 cup shredded sharp cheddar
- Cream cheese: 4 ounces, softened (for creaminess and binding)
- Mayonnaise: 2 tablespoons
- Hot sauce: 1–2 teaspoons (optional, for a little kick)
- Green onions: 2, thinly sliced (or 1/4 cup finely diced red onion)
- Garlic powder: 1 teaspoon
- Onion powder: 1/2 teaspoon
- Smoked paprika: 1/2 teaspoon (or regular paprika)
- Salt and pepper: To taste
- Butter: 4 tablespoons, melted
- Worcestershire sauce: 1 teaspoon
- Sesame or poppy seeds: 1 teaspoon (optional, for topping)
- Fresh parsley: 1 tablespoon chopped (optional, for garnish)
How to Make It
- Preheat the oven: Set it to 350°F (175°C). Line a 9×13-inch baking dish with parchment or lightly grease it.
- Split the rolls: Without separating the individual rolls, slice the entire slab horizontally to make a top and bottom. Place the bottom half in the baking dish.
- Make the chicken filling: In a large bowl, combine shredded chicken, mozzarella, cheddar, cream cheese, mayonnaise, hot sauce, green onions, garlic powder, onion powder, smoked paprika, salt, and pepper.
Mix until evenly coated and creamy.
- Assemble the sliders: Spread the chicken mixture evenly over the bottom half of the rolls. Place the top half of the rolls over the filling and press gently.
- Make the butter topping: Stir melted butter with Worcestershire and a pinch of garlic powder. Brush generously over the tops of the rolls.
Sprinkle with sesame or poppy seeds if using.
- Bake: Cover the dish loosely with foil and bake for 15 minutes. Remove foil and bake another 8–10 minutes, until the tops are golden and the cheese is melted.
- Rest, then slice: Let the sliders rest for 5 minutes so they set. Use a serrated knife to slice into individual pieces.
Garnish with parsley if you like.
- Serve: Enjoy warm with simple sides like a green salad, coleslaw, or roasted veggies.
How to Store
Let leftovers cool completely, then transfer to an airtight container. Refrigerate for up to 4 days. Reheat in a 300°F (150°C) oven for 10–12 minutes, or until warmed through. The oven keeps the tops crisp and the inside melty. If freezing, wrap individual sliders tightly in foil, place in a freezer bag, and freeze for up to 2 months. Reheat from frozen at 325°F (165°C) for 20–25 minutes, wrapped in foil to prevent drying out.
Benefits of This Recipe
- Quick and flexible: Rotisserie chicken and pantry staples help you get food on the table fast.
- Family-friendly: Mild, cheesy, and easy to customize for different tastes.
- Great for groups: One pan serves a crowd, and the sliders hold together nicely for passing around.
- Meal-prep friendly: Make the filling ahead, assemble later, and bake just before serving.
- Works with leftovers: A smart way to use up cooked chicken and stray cheese ends.
What Not to Do
- Don’t skip the foil at first: Baking covered helps the cheese melt evenly without over-browning the tops.
- Don’t use dry chicken: Overcooked or very dry chicken makes the filling chalky.
If needed, add an extra spoon of mayo or a splash of chicken broth.
- Don’t over-stuff: Too much filling can cause sliding and mess. Aim for an even, modest layer.
- Don’t slice immediately: A short rest makes cleaner cuts and prevents the cheese from oozing out.
- Don’t use low-moisture-only cheeses: A blend that includes a good melter (like mozzarella) gives the best texture.
Alternatives
- Buffalo style: Add more hot sauce and a little ranch or blue cheese dressing to the filling. Top with crumbled blue cheese after baking.
- BBQ twist: Swap hot sauce for 1/4 cup barbecue sauce and add a handful of diced red onion.
Serve with pickles.
- Jalapeño popper sliders: Mix in diced pickled jalapeños and extra cream cheese. Finish with a sprinkle of bacon bits.
- Mediterranean: Use provolone and mozzarella, add chopped roasted red peppers, spinach, and a little pesto.
- Lighter version: Use Greek yogurt instead of mayonnaise, reduce the cheese slightly, and add extra green onions and spinach.
- Gluten-free: Use gluten-free rolls and confirm your Worcestershire is gluten-free.
- Dairy-free: Use plant-based cream cheese and shredded dairy-free cheese, and olive oil instead of butter.
FAQ
Can I use canned chicken?
Yes, but drain it very well and fluff it with a fork. Mix in a little extra cream cheese or mayo to keep the filling moist.
Rotisserie chicken still gives the best texture and flavor.
What cheese melts best for these sliders?
Mozzarella is the champion for melt, while cheddar brings flavor. A blend of mozzarella and sharp cheddar is reliable. You can also add provolone for a bit more stretch and a mild, buttery note.
How do I keep the bottoms from getting soggy?
Spread the filling evenly, avoid excess liquid, and bake uncovered at the end to let moisture evaporate.
Toasting the bottom slab of rolls in the oven for 3–4 minutes before assembling can also help.
Can I assemble these ahead?
Yes. Assemble up to 6 hours in advance, cover, and refrigerate. Brush the butter topping just before baking, and add 2–3 extra minutes to the covered bake time since they’ll be cold.
What sides go well with cheesy chicken sliders?
Keep it simple: a crisp salad, coleslaw, roasted broccoli, sweet potato fries, or a pickle platter.
If you want a dip, ranch or a tangy barbecue sauce pairs nicely.
How can I make them spicier without overpowering the cheese?
Use a little extra hot sauce in the filling and add thin jalapeño slices under the cheese layer. You can also sprinkle in crushed red pepper or use pepper jack as part of the cheese blend.
What if I don’t have Hawaiian rolls?
Any soft dinner rolls or slider buns will work. Choose rolls that are connected as a slab for easier slicing and assembly, and aim for a slightly sweet roll if you want that classic flavor.
Can I use dark meat instead of chicken breast?
Absolutely.
Thigh meat stays juicy and adds richness. A mix of light and dark meat is a great balance if you have both.
Do I need the cream cheese?
It helps bind the filling and keeps it creamy, but you can skip it. If you do, add a bit more mayo or a spoon of Greek yogurt to avoid dryness.
How do I scale the recipe?
Double the ingredients and use two 9×13-inch pans, or one large sheet pan lined with parchment.
Bake times are similar; watch for golden tops and melty centers.
Final Thoughts
Cheesy chicken sliders hit that sweet spot between easy and irresistible. With simple ingredients and a few smart steps, you get soft, buttery rolls filled with creamy, melty chicken goodness. They’re flexible enough for weeknights and special enough for a party spread.
Make them once, and they’ll quickly become a go-to favorite in your kitchen. Keep the base recipe on hand, then mix in your own twists to keep things fresh and fun.
Printable Recipe Card
Want just the essential recipe details without scrolling through the article? Get our printable recipe card with just the ingredients and instructions.