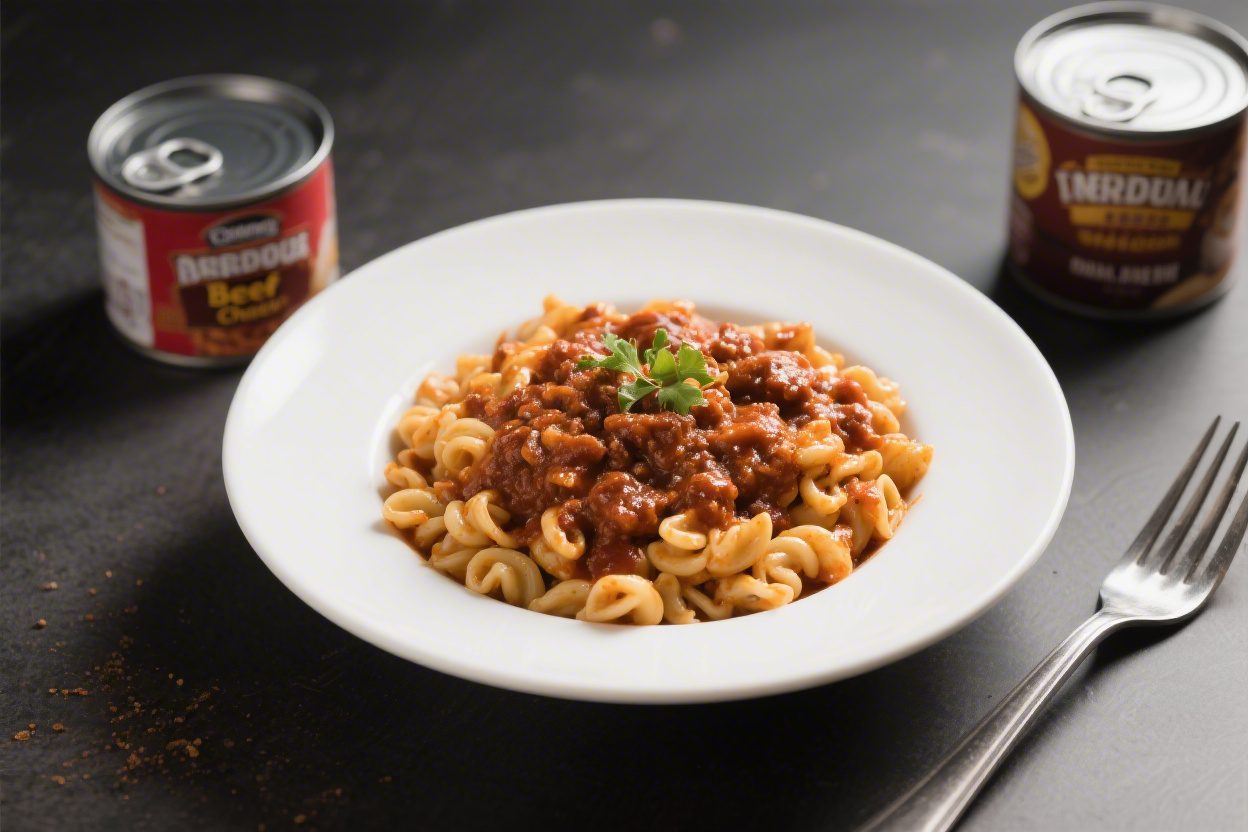
Canned Beef Chili Mac – A Comforting, Weeknight-Friendly Classic
Canned Beef Chili Mac is the kind of meal you keep up your sleeve for busy nights. It’s hearty, fast, and surprisingly satisfying, even when you’re short on time and energy. The canned chili brings bold flavor without a long simmer, while the macaroni and cheese add that familiar, cozy creaminess.
With a few pantry staples and a couple of smart upgrades, you can turn a simple can into a complete dinner that tastes homemade. It’s budget-friendly, kid-approved, and perfect for leftovers.
Ingredients
Method
- Boil the pasta: Bring a large pot of salted water to a boil. Cook the macaroni until just shy of al dente. Drain and set aside, reserving 1/2 cup of pasta water.
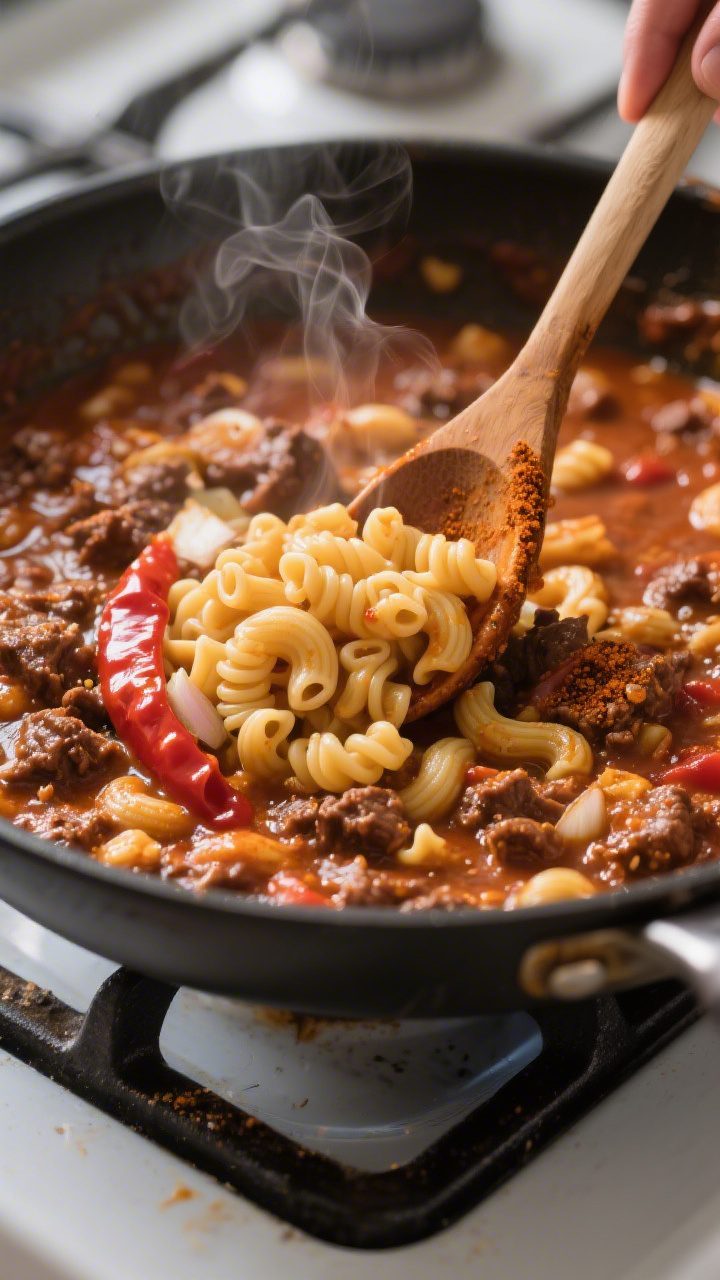
- Sauté aromatics: In a wide pot or deep skillet, melt 1 tablespoon of butter over medium heat. Add chopped onion and cook until translucent, 3–4 minutes. Stir in garlic for 30 seconds.
- Boost the chili: Add 1 teaspoon chili powder, 1/2 teaspoon cumin, and a small squeeze of tomato paste. Cook for 30–60 seconds to toast the spices.
- Add canned chili: Stir in the canned beef chili. Bring to a gentle simmer. Taste and season with salt and pepper as needed.
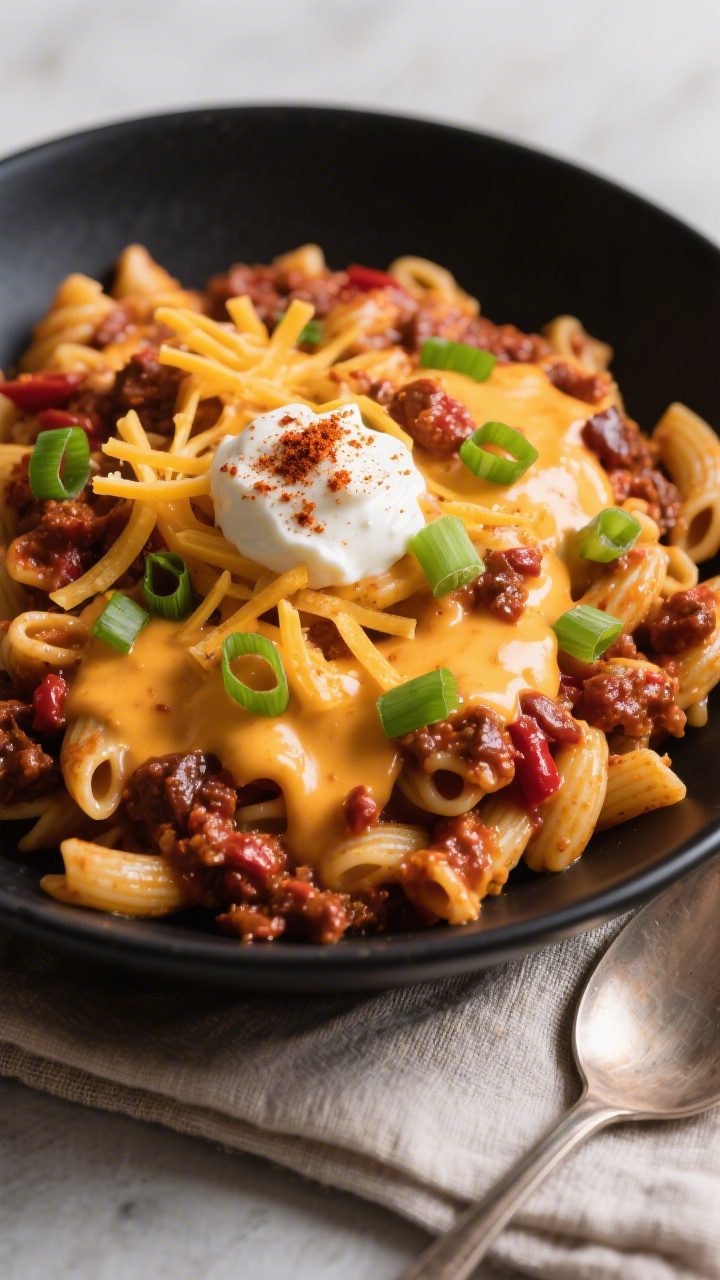
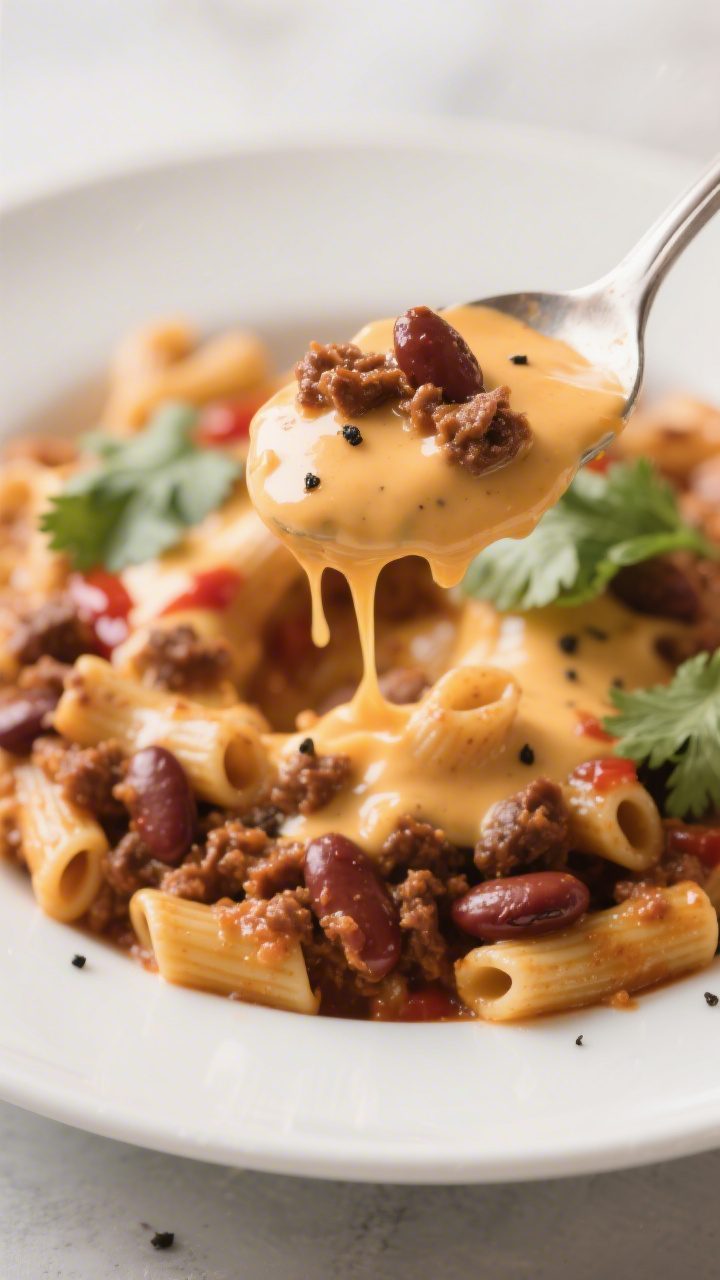
- Make a quick cheese sauce: In a small saucepan, melt 2 tablespoons of butter over medium heat. Whisk in 2 tablespoons of flour and cook 1 minute. Slowly whisk in 1 cup of milk until smooth and slightly thickened, 3–5 minutes. Off heat, stir in 1 to 1 1/2 cups shredded cheddar until melted. Season with a pinch of salt and pepper.
- Combine: Add the drained pasta to the chili. Pour in the cheese sauce and stir until everything is evenly coated. If it’s too thick, loosen with a splash of the reserved pasta water or more milk.
- Adjust and serve: Add hot sauce if you want more heat. Top with extra cheese, sliced green onions, or a dollop of sour cream. Serve warm.
What Makes This Recipe So Good
- Quick and Low Effort: You’re mostly heating, stirring, and combining. Dinner lands on the table in about 25 minutes.
- Great Flavor, Minimal Ingredients: Canned chili does the heavy lifting.
A few add-ins brighten and round it out.
- Comfort in a Bowl: Cheesy pasta plus chili is a winning combo—rich, savory, and satisfying.
- Flexible and Forgiving: Easy to adjust spice, cheese, and veggies based on what you have.
- Leftovers Reheat Well: It gets creamier as it rests, making tomorrow’s lunch even better.
Shopping List
- Elbow macaroni (or any short pasta like shells or rotini)
- Canned beef chili (with or without beans; 1–2 cans depending on serving size)
- Cheddar cheese, shredded (sharp or medium)
- Milk (whole or 2%)
- Butter
- All-purpose flour (for a quick cheese sauce)
- Onion, finely chopped (optional but recommended)
- Garlic, minced (fresh or jarred)
- Tomato paste or ketchup (a small squeeze to deepen flavor)
- Chili powder and/or cumin (to enhance the canned chili)
- Salt and black pepper
- Hot sauce or crushed red pepper (optional for heat)
- Green onions or cilantro (optional garnish)
- Sour cream (optional topping)
Step-by-Step Instructions
- Boil the pasta: Bring a large pot of salted water to a boil. Cook the macaroni until just shy of al dente. Drain and set aside, reserving 1/2 cup of pasta water.
- Sauté aromatics: In a wide pot or deep skillet, melt 1 tablespoon of butter over medium heat.
Add chopped onion and cook until translucent, 3–4 minutes. Stir in garlic for 30 seconds.
- Boost the chili: Add 1 teaspoon chili powder, 1/2 teaspoon cumin, and a small squeeze of tomato paste. Cook for 30–60 seconds to toast the spices.
- Add canned chili: Stir in the canned beef chili.
Bring to a gentle simmer. Taste and season with salt and pepper as needed.
- Make a quick cheese sauce: In a small saucepan, melt 2 tablespoons of butter over medium heat. Whisk in 2 tablespoons of flour and cook 1 minute.
Slowly whisk in 1 cup of milk until smooth and slightly thickened, 3–5 minutes. Off heat, stir in 1 to 1 1/2 cups shredded cheddar until melted. Season with a pinch of salt and pepper.
- Combine: Add the drained pasta to the chili.
Pour in the cheese sauce and stir until everything is evenly coated. If it’s too thick, loosen with a splash of the reserved pasta water or more milk.
- Adjust and serve: Add hot sauce if you want more heat. Top with extra cheese, sliced green onions, or a dollop of sour cream.
Serve warm.
Keeping It Fresh
- Storage: Cool completely, then store in an airtight container in the fridge for up to 4 days.
- Reheating: Warm gently on the stove or in the microwave with a splash of milk or water to bring back creaminess. Stir halfway for even heating.
- Freezing: You can freeze it, but the pasta may soften. If freezing, undercook the pasta by 1–2 minutes.
Freeze up to 2 months, thaw overnight, and reheat with a little milk.
- Freshen leftovers: Stir in a handful of fresh cheese, a squeeze of lime, or chopped herbs to brighten flavors.
Health Benefits
- Protein and iron: Beef chili adds protein for satiety and iron for energy support.
- Complex carbs: Pasta provides steady energy, especially if you choose whole wheat or high-protein varieties.
- Calcium: The cheese and milk contribute calcium for bones and teeth.
- Add-on veggies: Stir in corn, bell peppers, tomatoes, or spinach to boost fiber, vitamins, and color.
What Not to Do
- Don’t overcook the pasta: It will continue to soften when mixed with the sauce.
- Don’t skip tasting: Canned chili varies. Always taste and adjust salt, spice, and acidity.
- Don’t over-thicken the sauce: A too-thick cheese sauce clumps. Keep a little milk or pasta water on hand to loosen.
- Don’t crank the heat: High heat can split the cheese sauce.
Keep it gentle once the cheese is in.
Alternatives
- Cheese swaps: Try pepper jack for heat, Colby for mild creaminess, or a mix of cheddar and Monterey Jack.
- Pasta options: Shells, rotini, cavatappi, or gluten-free pasta all work well.
- Chili choices: Use no-bean chili, turkey chili, or vegetarian bean chili if preferred.
- Lighter version: Swap half the cheese for Greek yogurt (stir in off heat) and use reduced-fat milk.
- One-pot shortcut: Cook the pasta directly in the chili with an extra cup of water or broth, then stir in cheese at the end. Stir often to prevent sticking.
- Veggie boosts: Add diced bell peppers with the onions, corn with the chili, or baby spinach at the end to wilt.
FAQ
Can I make this without a roux-based cheese sauce?
Yes. Stir shredded cheese directly into the hot chili and pasta with a splash of milk or cream.
It won’t be as silky but still tastes great. Add cheese gradually and keep the heat low.
How many cans of chili should I use?
For 8 ounces of dry pasta, use 1 to 1 1/2 cans for a thicker, cheesier mac, or 2 cans for a saucier, chili-forward bowl. Adjust to your preference.
What if my sauce turns grainy?
Grainy sauce usually comes from overheating the cheese.
Remove from heat, whisk in a bit more warm milk, and stir until smoother. Next time, lower the heat and add cheese off the burner.
Can I make it spicier?
Absolutely. Add jalapeños with the onions, use pepper jack, sprinkle in cayenne, or finish with hot sauce.
Taste as you go.
Is there a way to add more veggies without changing the flavor too much?
Yes. Finely chop bell peppers, carrots, or zucchini and sauté with the onions. They’ll soften and blend into the dish while adding nutrients.
What’s the best noodle shape for holding sauce?
Elbows, shells, or cavatappi are ideal.
Their curves and ridges hold onto the chili and cheese for better bites.
Can I make this ahead for meal prep?
Yes. Cook the pasta slightly under al dente, combine as directed, and portion into containers. Reheat with a splash of milk and a sprinkle of fresh cheese.
In Conclusion
Canned Beef Chili Mac turns pantry basics into a cozy, crowd-pleasing meal with minimal effort.
A few smart upgrades—like sautéed onions, warm spices, and a quick cheese sauce—make it taste like you cooked all afternoon. It’s flexible, affordable, and dependable on weeknights or lazy weekends. Keep the staples on hand, and you’ll always have a hearty dinner ready in minutes.
Printable Recipe Card
Want just the essential recipe details without scrolling through the article? Get our printable recipe card with just the ingredients and instructions.