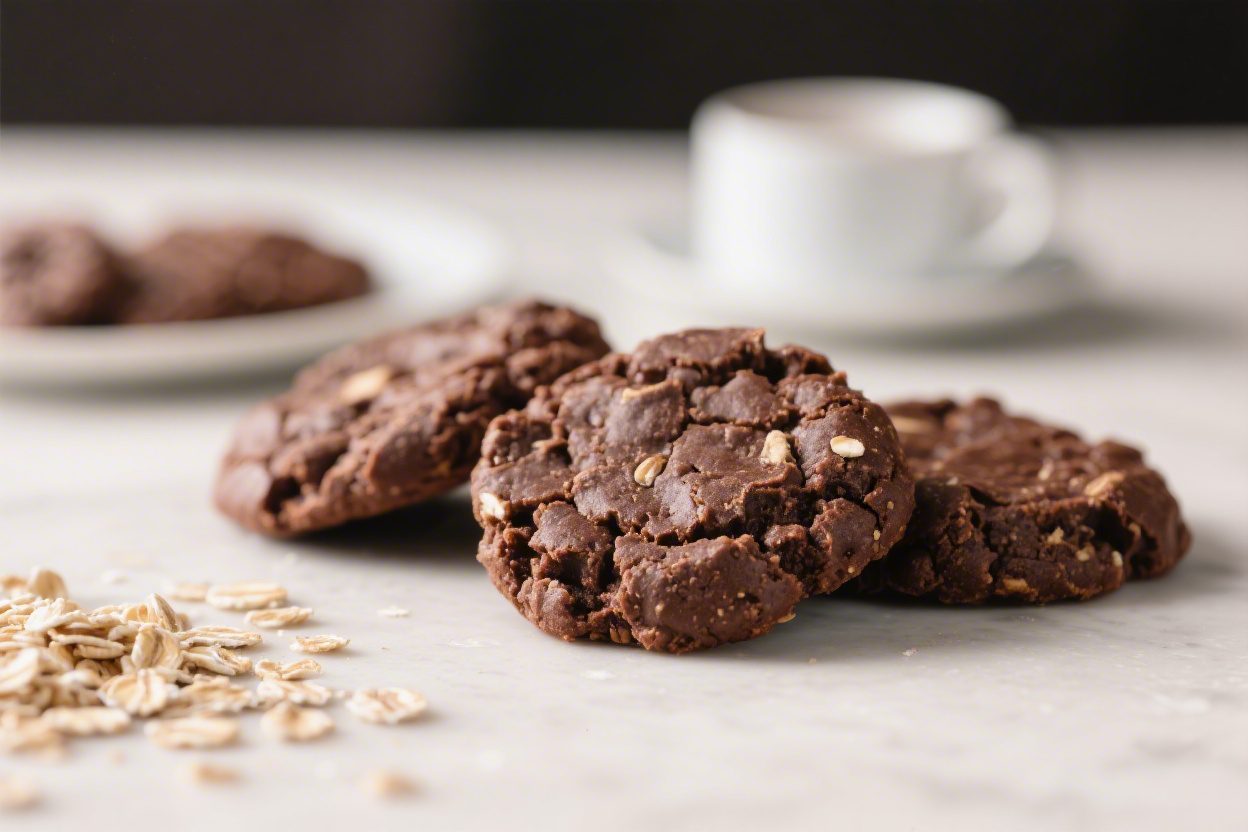
No-Bake Chocolate Oatmeal Cookies – Simple, Chewy, and Ready in Minutes
These no-bake chocolate oatmeal cookies are the kind of treat you can whip up on a weeknight without breaking a sweat. They’re rich, chocolatey, and chewy with just the right amount of sweetness. No oven, no fancy tools, and no waiting around for hours.
If you’ve got cocoa, oats, and a stick of butter, you’re already halfway there. They’re great for lunch boxes, last-minute guests, or those nights when you want dessert now, not later.
Ingredients
Method
- Prep your space: Line two baking sheets with parchment or wax paper. Clear a spot on your counter for spooning out the cookies. Measure all ingredients before you start; this recipe moves fast.
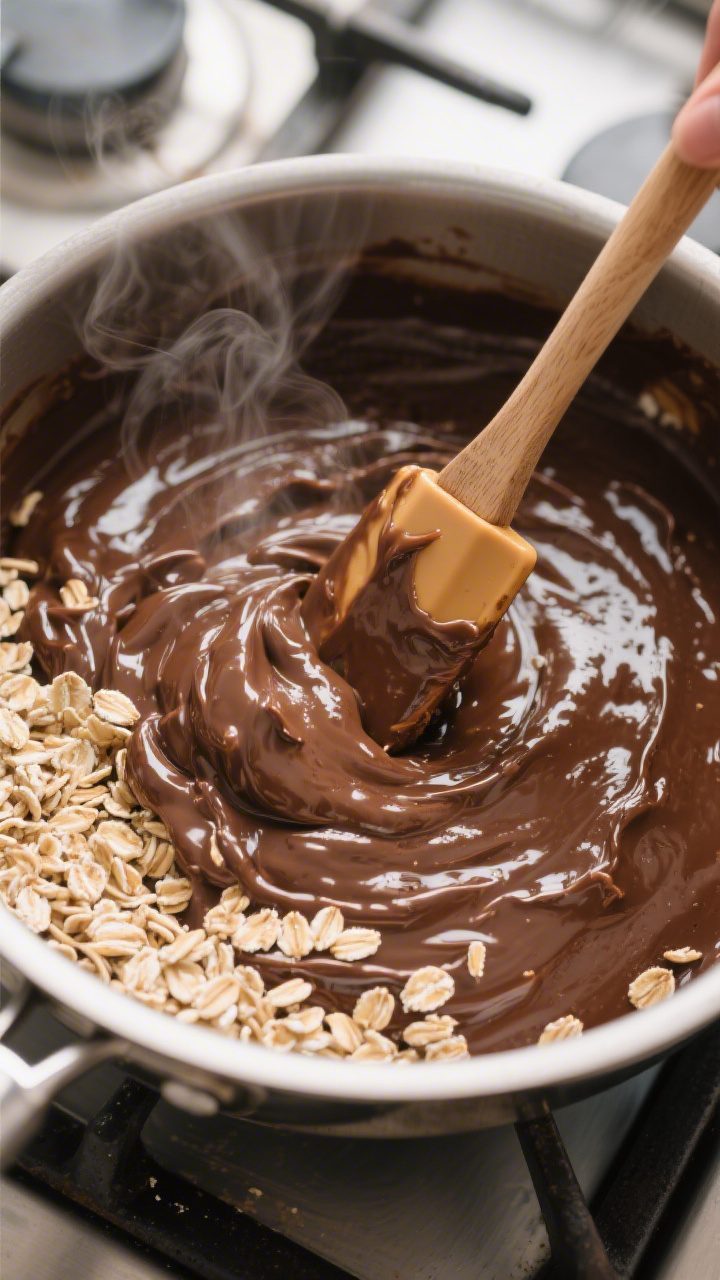
- Melt and mix the base: In a medium saucepan over medium heat, combine the butter, sugar, cocoa powder, and milk. Stir gently until the butter melts and the mixture looks smooth and glossy.
- Bring to a boil—then time it: Increase heat to medium-high and bring the mixture to a full rolling boil. Once it’s bubbling across the entire surface, boil for exactly 60 seconds, stirring occasionally. This timing helps the cookies set properly.
- Remove from heat and flavor: Take the pan off the heat. Stir in the peanut butter (if using) until fully melted and smooth. Add vanilla and salt. The mixture should be thick and fudgy.
- Add the oats: Stir in the oats until everything is evenly coated. The mixture should hold together but still be scoopable. If it looks too loose, add a small handful of oats. If it’s too stiff, add a splash of milk.
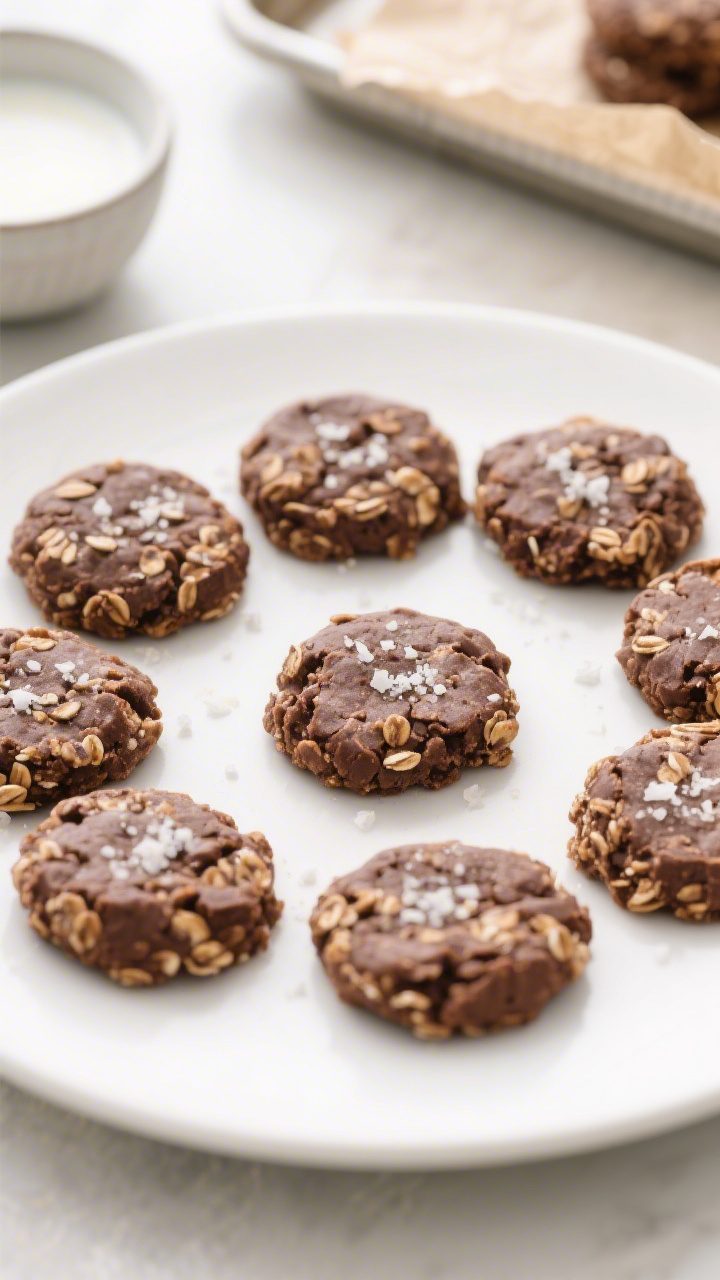
- Scoop and shape: Use a spoon or a cookie scoop to drop mounds onto the lined sheets. For neater edges, lightly press and shape with the back of a spoon.
- Let them set: Leave the cookies at room temperature for 20–30 minutes, or pop them in the fridge for 10–15 minutes to speed things up.
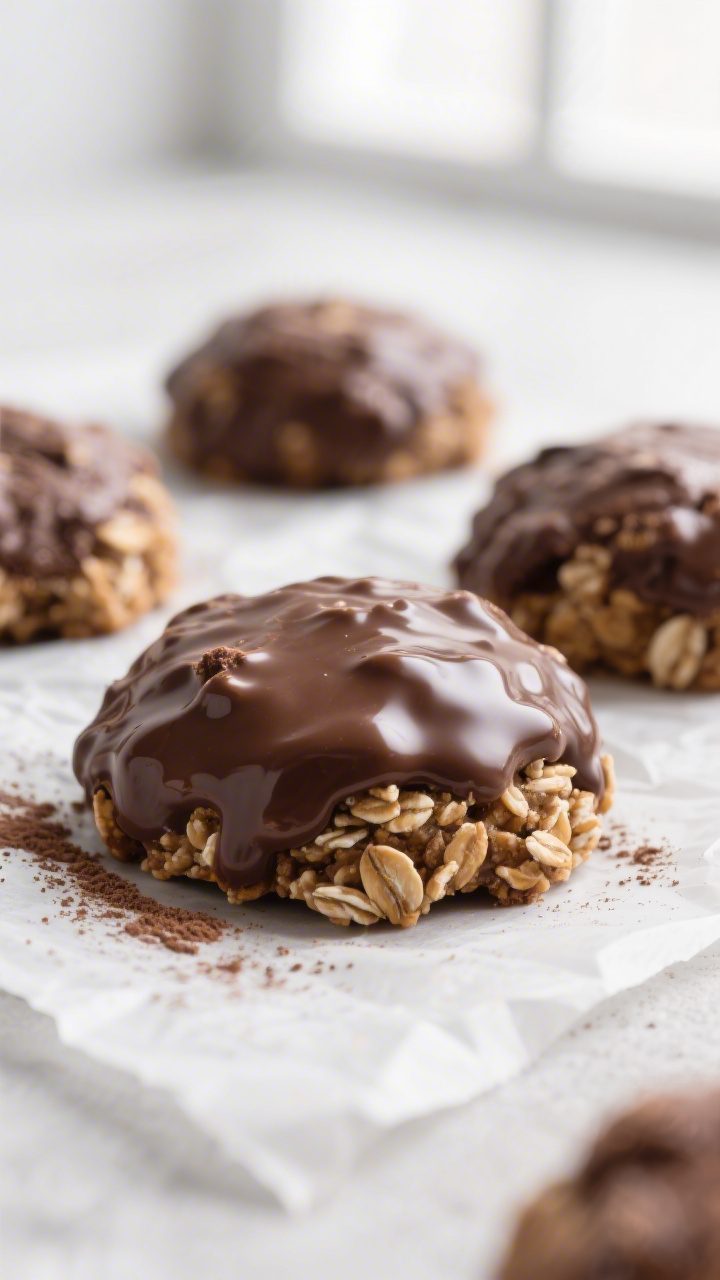
- Serve and enjoy: Once firm, the cookies are ready to eat. They’ll be soft and chewy with a rich chocolate flavor.
What Makes This Recipe So Good
- No baking required: The stovetop does the work, and the cookies set at room temperature or in the fridge.
- Perfect texture: Soft, fudgy, and chewy, with a little bite from the oats.
- Pantry-friendly: Uses simple ingredients you probably already have on hand.
- Quick to make: The cooking part takes about 5 minutes; the rest is just cooling time.
- Easy to customize: Add peanut butter, swap the milk, or fold in nuts for your ideal cookie.
Ingredients
- 1/2 cup (1 stick) unsalted butter
- 2 cups granulated sugar
- 1/2 cup unsweetened cocoa powder
- 1/2 cup milk (whole or 2% for best texture; dairy-free works too)
- 1/2 cup creamy peanut butter (optional but classic; use almond or sunflower seed butter if preferred)
- 1 teaspoon vanilla extract
- 1/4 teaspoon fine salt
- 3 cups quick-cooking oats (use old-fashioned oats for more chew; see notes below)
How to Make It
- Prep your space: Line two baking sheets with parchment or wax paper. Clear a spot on your counter for spooning out the cookies.
Measure all ingredients before you start; this recipe moves fast.
- Melt and mix the base: In a medium saucepan over medium heat, combine the butter, sugar, cocoa powder, and milk. Stir gently until the butter melts and the mixture looks smooth and glossy.
- Bring to a boil—then time it: Increase heat to medium-high and bring the mixture to a full rolling boil. Once it’s bubbling across the entire surface, boil for exactly 60 seconds, stirring occasionally.
This timing helps the cookies set properly.
- Remove from heat and flavor: Take the pan off the heat. Stir in the peanut butter (if using) until fully melted and smooth. Add vanilla and salt.
The mixture should be thick and fudgy.
- Add the oats: Stir in the oats until everything is evenly coated. The mixture should hold together but still be scoopable. If it looks too loose, add a small handful of oats.
If it’s too stiff, add a splash of milk.
- Scoop and shape: Use a spoon or a cookie scoop to drop mounds onto the lined sheets. For neater edges, lightly press and shape with the back of a spoon.
- Let them set: Leave the cookies at room temperature for 20–30 minutes, or pop them in the fridge for 10–15 minutes to speed things up.
- Serve and enjoy: Once firm, the cookies are ready to eat. They’ll be soft and chewy with a rich chocolate flavor.
Storage Instructions
- Room temperature: Store in an airtight container for 3–4 days.
Place parchment between layers to prevent sticking.
- Refrigerator: Keeps for up to 1 week. Chilling makes them a bit firmer and fudgier.
- Freezer: Freeze on a sheet until solid, then transfer to a freezer bag. They keep well for up to 2 months.
Thaw at room temperature for 10–15 minutes before serving.
Benefits of This Recipe
- Fast and reliable: From start to finish, it’s about 15 minutes of active time.
- Kid-friendly: Easy steps and no oven make it great for supervised cooking with kids.
- Gluten-friendly option: Use certified gluten-free oats if needed.
- Flexible with dietary needs: Works with plant-based milks and nut-free butters.
- Budget-friendly: Uses common, affordable pantry staples with big flavor payoff.
What Not to Do
- Don’t skip the timed boil: Under-boiling leads to sticky, soft cookies that don’t set; over-boiling makes them dry and crumbly.
- Don’t add oats before turning off the heat: Too much heat can make them tough and affect texture.
- Don’t use steel-cut oats: They won’t soften correctly. Stick with quick oats or old-fashioned oats.
- Don’t overpack the sugar: Measure it level. Too much sugar can cause graininess.
- Don’t rush the setup: Let them cool and set fully; moving them too soon can cause breakage.
Alternatives
- No peanut butter: Skip it for a purer chocolate flavor, or use almond, cashew, or sunflower seed butter for a similar creaminess.
- Dairy-free: Use plant-based butter and non-dairy milk.
Coconut oil also works, but use 7 tablespoons instead of 8 for better set.
- Less sweet: Reduce sugar to 1 3/4 cups for a slightly darker, less sweet cookie. The set may be a bit softer but still solid.
- Add-ins: Fold in 1/2 cup chopped nuts, shredded coconut, or mini chocolate chips after adding the oats.
- Old-fashioned oats: Use 2 1/2 to 2 3/4 cups instead of 3 cups, since they’re bulkier. Expect a heartier chew.
- Flavor twists: Add 1/2 teaspoon espresso powder to deepen the chocolate, or 1/2 teaspoon cinnamon for warmth.
FAQ
Why didn’t my cookies set?
If they’re sticky or won’t firm up, they likely didn’t boil long enough.
The 60-second rolling boil helps the sugar reach a temperature that sets as it cools. You can also chill them to firm up, or rewarm the mixture gently and add a few tablespoons more oats.
Can I use old-fashioned oats instead of quick oats?
Yes. The cookies will be a bit chewier and chunkier.
Use slightly less—about 2 1/2 to 2 3/4 cups—to keep the mixture from becoming too dry.
How do I fix dry or crumbly cookies?
They were probably boiled too long or had too many oats. Next time, reduce the boil time to exactly 60 seconds and measure the oats carefully. For a current batch, drizzle a little warm milk over the mixture and stir, then reshape.
Is there a nut-free version?
Absolutely.
Skip the peanut butter or replace it with sunflower seed butter. The texture will still be rich and fudgy, especially if you keep the 60-second boil.
Can I cut the sugar?
You can reduce it to 1 3/4 cups without major issues. Just know that sugar affects structure as well as sweetness, so cookies may be a touch softer.
Do I need a candy thermometer?
No.
Timing the rolling boil for 60 seconds works well for this recipe. Keep the heat steady and make sure the entire surface is bubbling during that minute.
How long do they last?
At room temperature, about 3–4 days in an airtight container. In the fridge, up to a week.
Frozen, up to 2 months with minimal loss of texture.
Can I make them smaller or bigger?
Yes. Use a teaspoon for bite-sized cookies or a large scoop for bakery-style ones. Smaller cookies set faster; larger ones may need a few extra minutes of cooling.
Wrapping Up
No-bake chocolate oatmeal cookies are a classic for a reason: they’re fast, forgiving, and deeply satisfying.
With a few pantry staples and a one-minute boil, you get a batch of chewy, chocolatey cookies that feel homemade in the best way. Keep this recipe handy for busy nights, bake sales, or whenever you want dessert without turning on the oven. Once you’ve made them, you’ll probably memorize the steps—and that’s when the fun variations begin.
Enjoy!
Printable Recipe Card
Want just the essential recipe details without scrolling through the article? Get our printable recipe card with just the ingredients and instructions.