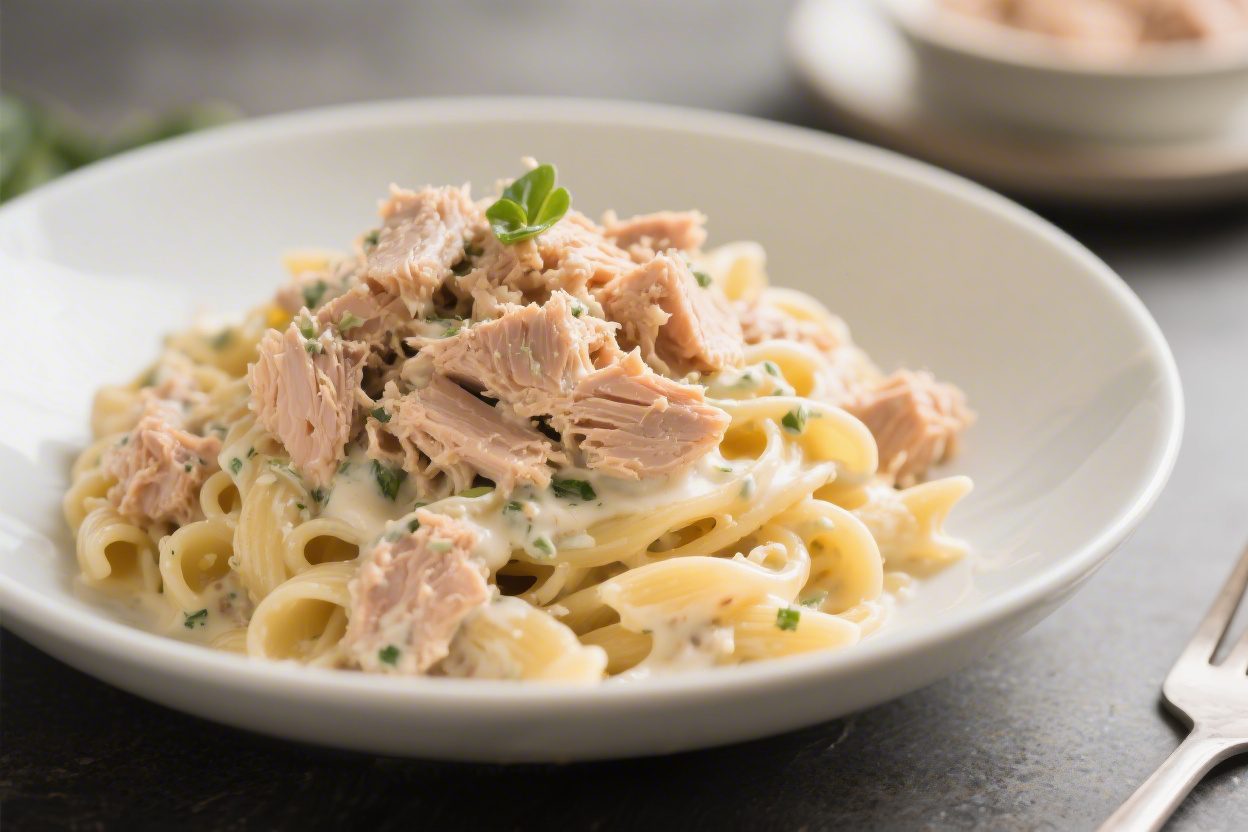
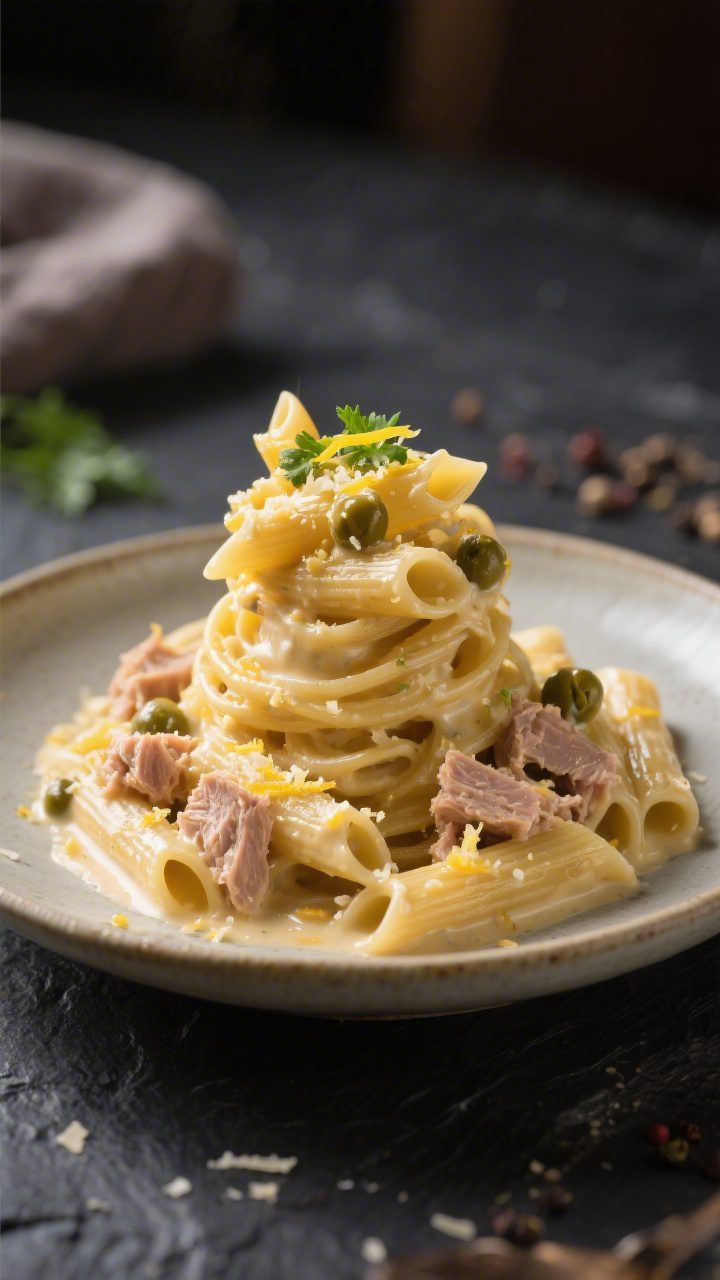
Canned Tuna Pasta (Creamy & Easy) – Weeknight Comfort in Minutes
Creamy tuna pasta is the kind of meal you make when the day ran long and dinner still needs to happen. It’s fast, filling, and surprisingly comforting. This version uses pantry staples, a few fresh touches, and a silky sauce that comes together while the pasta cooks.
No fancy steps, no complicated ingredients—just real food that tastes good. If you love recipes that work hard with little effort, this one’s a keeper.
Ingredients
Method
- Boil the pasta: Bring a large pot of salted water to a boil. Cook pasta until just shy of al dente. Reserve at least 1 cup of pasta water before draining.
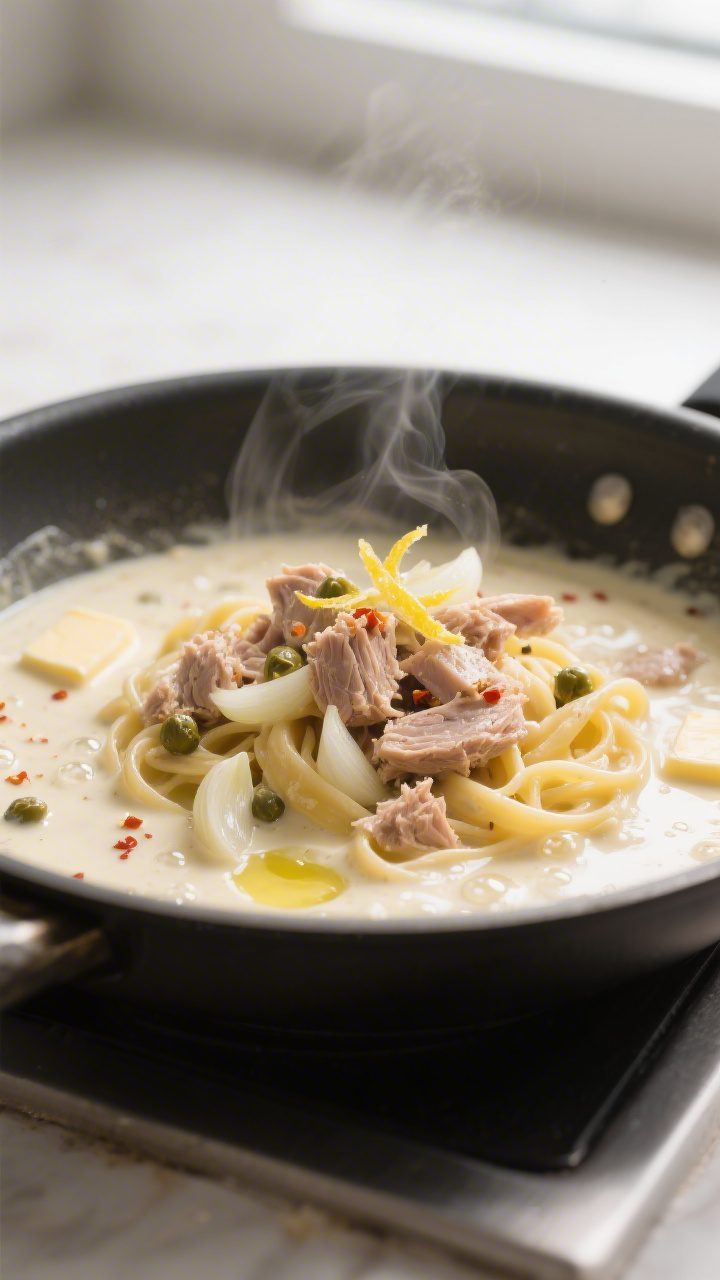
- Sauté aromatics: While pasta cooks, heat olive oil and butter in a large skillet over medium heat. Add shallot and cook 2–3 minutes until softened. Stir in garlic and cook 30 seconds until fragrant.
- Add tuna: Flake in the tuna, stirring gently so some pieces stay chunky. Warm it through for 1–2 minutes. If using chili flakes, add them now.
- Build the sauce: Pour in the cream and 1/2 cup pasta water. Stir in Dijon. Simmer gently for 2–3 minutes until slightly thickened and glossy.
- Season and brighten: Add lemon zest, lemon juice, and capers. Taste and season with salt and plenty of black pepper. The sauce should be well-seasoned but not salty.
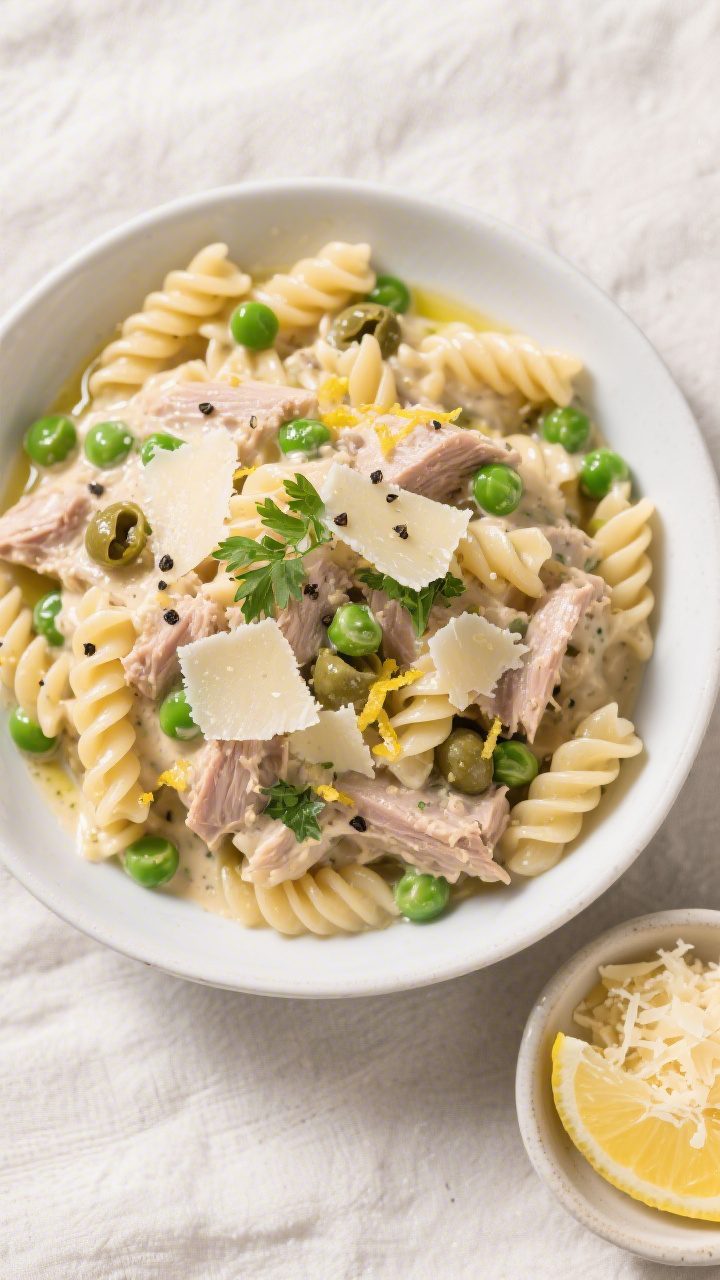
- Combine with pasta: Add drained pasta to the skillet and toss to coat. Sprinkle in Parmesan and toss again. If the sauce tightens, loosen with more pasta water a splash at a time until silky.
- Finish: If using peas, stir them in now and warm for 1 minute. Turn off heat. Add a drizzle of olive oil for shine and richness.
- Serve: Top with chopped parsley, extra Parmesan, and another crack of pepper. Serve hot with lemon wedges if you like more brightness.
Why This Recipe Works
- Pantry-friendly: Canned tuna, pasta, and a few basics build a full meal with minimal shopping.
- Creamy without heaviness: A mix of cream and pasta water creates a light, glossy sauce that clings to every bite.
- Balanced flavors: Garlic, lemon, and a little Dijon cut through richness and make the tuna taste fresh, not fishy.
- Quick timing: The sauce is done in the time it takes to boil the pasta—dinner in 20 minutes.
- Flexible: Add peas, capers, or chili flakes to suit your mood and what’s in your kitchen.
Ingredients
- 8 ounces (225 g) short pasta (penne, fusilli, or shells)
- 2 tablespoons olive oil
- 2 tablespoons unsalted butter
- 3 cloves garlic, minced
- 1 small shallot, finely chopped (or 1/4 small onion)
- 2 cans (5 oz/140 g each) tuna, drained (oil-packed for richer flavor, water-packed for lighter)
- 1/2 cup (120 ml) heavy cream (or half-and-half for lighter)
- 1/2 cup (120 ml) pasta cooking water, reserved
- 1 teaspoon Dijon mustard
- 1/2 teaspoon chili flakes (optional, to taste)
- Zest of 1/2 lemon and 2 teaspoons lemon juice
- 1/2 cup grated Parmesan, plus more for serving
- 2 tablespoons capers, drained (optional but great)
- 1/2 cup frozen peas (optional)
- Salt and freshly ground black pepper, to taste
- Fresh parsley, chopped, for garnish
Step-by-Step Instructions
- Boil the pasta: Bring a large pot of salted water to a boil. Cook pasta until just shy of al dente.
Reserve at least 1 cup of pasta water before draining.
- Sauté aromatics: While pasta cooks, heat olive oil and butter in a large skillet over medium heat. Add shallot and cook 2–3 minutes until softened. Stir in garlic and cook 30 seconds until fragrant.
- Add tuna: Flake in the tuna, stirring gently so some pieces stay chunky.
Warm it through for 1–2 minutes. If using chili flakes, add them now.
- Build the sauce: Pour in the cream and 1/2 cup pasta water. Stir in Dijon.
Simmer gently for 2–3 minutes until slightly thickened and glossy.
- Season and brighten: Add lemon zest, lemon juice, and capers. Taste and season with salt and plenty of black pepper. The sauce should be well-seasoned but not salty.
- Combine with pasta: Add drained pasta to the skillet and toss to coat.
Sprinkle in Parmesan and toss again. If the sauce tightens, loosen with more pasta water a splash at a time until silky.
- Finish: If using peas, stir them in now and warm for 1 minute. Turn off heat.
Add a drizzle of olive oil for shine and richness.
- Serve: Top with chopped parsley, extra Parmesan, and another crack of pepper. Serve hot with lemon wedges if you like more brightness.
Storage Instructions
- Fridge: Store leftovers in an airtight container for up to 3 days.
- Reheat: Warm gently on the stove over low heat with a splash of water, milk, or cream to loosen the sauce. Avoid high heat to prevent curdling.
- Freezer: Not ideal.
Cream sauces tend to split after thawing, and the pasta can become mushy.
Benefits of This Recipe
- Budget-friendly: Canned tuna and pasta stretch far without sacrificing flavor.
- Protein-rich: Tuna brings lean protein, making the dish satisfying.
- Fast and low-effort: Minimal chopping and quick cooking mean less time in the kitchen.
- Customizable: Works with whatever you have—swap herbs, adjust heat, add veggies.
- Great for beginners: Straightforward steps and forgiving timing.
What Not to Do
- Don’t skip salting the pasta water: It’s your main chance to season the pasta from within.
- Don’t boil the cream hard: Keep it at a gentle simmer to avoid splitting and graininess.
- Don’t overcook the pasta: Slightly under al dente is best; it will finish in the sauce.
- Don’t drain all the pasta water: That starchy liquid is key to a silky, clinging sauce.
- Don’t use tuna straight from the can without tasting: Some brands are saltier—adjust seasoning accordingly.
Variations You Can Try
- Garlic-lemon light version: Swap cream for a knob of butter and extra pasta water; finish with more lemon and parsley.
- Spicy arrabbiata twist: Add a spoonful of tomato paste with the aromatics and extra chili flakes.
- Mediterranean style: Stir in olives, sun-dried tomatoes, and a pinch of oregano; finish with crumbled feta instead of Parmesan.
- Veggie boost: Add spinach, zucchini ribbons, or roasted cherry tomatoes for color and texture.
- Herb-forward: Fold in basil, dill, or chives at the end for fresh, bright flavor.
- Lighter dairy: Use half-and-half or evaporated milk. Simmer gently and rely on Parmesan and pasta water for body.
- Crunch factor: Top servings with toasted breadcrumbs mixed with lemon zest and parsley.
FAQ
Which type of canned tuna is best for this pasta?
Oil-packed tuna gives richer flavor and a silkier sauce, while water-packed keeps it lighter. Solid or chunk light tuna works well; albacore is milder but can be drier, so add a touch more olive oil if using it.
Can I make this without cream?
Yes.
Use 2–3 tablespoons of butter and extra pasta water to create an emulsion, then finish with Parmesan. You’ll get a glossy, lighter sauce with good body.
How do I prevent a fishy taste?
Use good-quality tuna, add lemon zest and juice for brightness, and don’t overcook the tuna in the pan. Dijon and capers also help balance the flavor.
What pasta shape works best?
Short shapes like fusilli, penne, shells, or orecchiette catch the sauce and tuna nicely.
That said, spaghetti or linguine also work—just toss well to coat.
Can I add vegetables?
Definitely. Peas, spinach, broccoli florets (par-cooked), or roasted peppers are all great. Add quick-cooking veggies in the last minute to keep them vibrant.
Is there a gluten-free option?
Use your favorite gluten-free pasta and check labels on Dijon and capers.
Reserve extra pasta water since some GF pastas absorb more sauce.
How can I make it more tangy or briny?
Add more capers, a splash of the caper brine, a few chopped olives, or an extra squeeze of lemon to taste.
What cheese can I use instead of Parmesan?
Pecorino Romano adds a sharper, saltier kick. For a milder profile, try Grana Padano. Avoid melty cheeses here; you want a hard, grating cheese for the right texture.
Can I meal-prep this?
It’s best fresh, but you can prep components.
Chop aromatics and zest the lemon ahead. Leftovers reheat well with a splash of liquid, so it’s still a solid next-day lunch.
How do I thicken a runny sauce?
Simmer for another minute and add a bit more Parmesan. If still thin, let the pasta sit in the sauce off heat for 2 minutes to absorb and thicken.
Final Thoughts
This creamy canned tuna pasta proves you don’t need a long ingredients list or hours in the kitchen to make something satisfying.
It’s simple, cozy, and totally reliable. Keep a couple of tuna cans and a box of pasta in the pantry, and you’re never far from a good meal. Make it as written the first time, then play with the variations and make it yours.
Printable Recipe Card
Want just the essential recipe details without scrolling through the article? Get our printable recipe card with just the ingredients and instructions.